Adjustable Rear Springs - How?
24 posts
• Page 1 of 2 • 1, 2
I have purchased a set of Toyo RA1s 185/60R13s to replace my current 185/60R13s. The issue is that the Toyo's are about a 1/2" wider and I'm concerned that I may have a clearance issue on my right rear fender. Attached are pictures of my right rear and left rear clearances and the adjustable spring settings. My right rear fender measure 21" from the ground, whereas my left rear measures 21.25", and that 1/4" seems to make a big difference in clearance, plus I would like to have the car even on both sides. Does anyone recognize these adjustable springs and can tell me how to adjust them? They certainly don't move by just pushing them, but is there a tool I'm missing or is there a special method of persuading them to move. Thanks. Dan
-

collins_dan - Coveted Fifth Gear

- Posts: 1203
- Joined: 09 Jan 2006
Dan
Hmmmmm...some people on here suspect I'm a bit of a bodger...but even I'm not sure about these.....looks like you've driven a few miles down a gravel road and got some stuck.
I would seriously look at getting some adjustable sping platforms from the usual suspects..
John
Hmmmmm...some people on here suspect I'm a bit of a bodger...but even I'm not sure about these.....looks like you've driven a few miles down a gravel road and got some stuck.
I would seriously look at getting some adjustable sping platforms from the usual suspects..
John
-

john.p.clegg - Coveted Fifth Gear

- Posts: 5745
- Joined: 21 Sep 2003
I agree with John C.
That set up is a "Bodge"
Just smaller Dia. Springs fitted onto standard Spring retainers.
Got any Photos of the bottom end?
That's where you should find a threaded Sleeve fitted to the Damper Tube & the Spting should be sitting on a threaded Spring seat backed up by a locking Ring.
I assume that the "things" jammed into the Spring upper Coils are some sort of "Bump Stop"
I'm anticipating that the Spring is sitting in the original lower Seats (Perches) also.
Cheers
John
Beware of the Illuminati
Editor: On Sunday morning, February 8th 2015, Derek "John" Pelly AKA GrumpyBodger passed away genuinely peacefully at Weston Hospicecare, Weston Super Mare. He will be missed.
Editor: On Sunday morning, February 8th 2015, Derek "John" Pelly AKA GrumpyBodger passed away genuinely peacefully at Weston Hospicecare, Weston Super Mare. He will be missed.
-

GrUmPyBoDgEr - Coveted Fifth Gear

- Posts: 3062
- Joined: 29 Oct 2004
Dan,
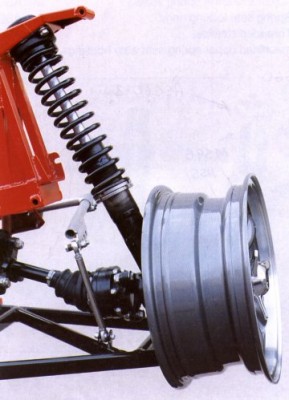
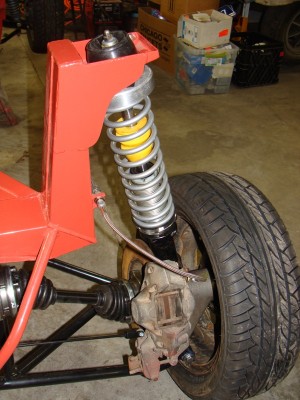
Here is a picture of small diameter springs on a lotus frame with stock lotus arms. You gain clearance to the inside, so unless you add offset to wheel fender lip clearance in the rear will be an issue
George
PS your set up looks suspect to me
Here is a picture of small diameter springs on a lotus frame with stock lotus arms. You gain clearance to the inside, so unless you add offset to wheel fender lip clearance in the rear will be an issue
George
PS your set up looks suspect to me
- cabc26b
- Fourth Gear

- Posts: 956
- Joined: 21 Sep 2003
The adjustable spring platforms are on my list, along with TTR's fast road shocks for front and rear, but I can't afford to make the change at this point. This year was tires, next year is suspension. This car was set up this way at least 25 years ago and drives great, so its not a bodge, its just old. Where are all the old curmudgeons when you need them... Thanks. Dan PS. The perches are original, but cut away on the outside for wheel clearance. Wheels are 5.5".
-

collins_dan - Coveted Fifth Gear

- Posts: 1203
- Joined: 09 Jan 2006
collins_dan wrote:The adjustable spring platforms are on my list, along with TTR's fast road shocks for front and rear, but I can't afford to make the change at this point. This year was tires, next year is suspension. This car was set up this way at least 25 years ago and drives great, so its not a bodge, its just old. Where are all the old curmudgeons when you need them... Thanks. Dan PS. The perches are original, but cut away on the outside for wheel clearance. Wheels are 5.5".
That it works was not questioned; however that these Springs stayed centered in the original Spring retainers has remained a matter of luck, unless the Man who did that job added some unseen centering device for the smaller Springs.
No matter which way I look at it, for me it's a cheap Bodge!
Let's see what "the old curmudgeons" have to say
What are those things jammed into the upper Spring Coils?
John
Beware of the Illuminati
Editor: On Sunday morning, February 8th 2015, Derek "John" Pelly AKA GrumpyBodger passed away genuinely peacefully at Weston Hospicecare, Weston Super Mare. He will be missed.
Editor: On Sunday morning, February 8th 2015, Derek "John" Pelly AKA GrumpyBodger passed away genuinely peacefully at Weston Hospicecare, Weston Super Mare. He will be missed.
-

GrUmPyBoDgEr - Coveted Fifth Gear

- Posts: 3062
- Joined: 29 Oct 2004
Looks like the things jammed in the springs are what keeps the springs centred. They look a bit like the grips on spring compressors, i.e. shaped to grip the springs and the tips appear to push against the damper tube, hopefully keeping it centred...
Still looks a bit dicey though I have to say. Sorry Dan
Robbie
Still looks a bit dicey though I have to say. Sorry Dan
Robbie
-

Robbie693 - Coveted Fifth Gear

- Posts: 1638
- Joined: 08 Oct 2003
I don't want to defend these things, bodge or not, they have worked for many years and I'm just hoping for one more. It appears that at the top, the very center is recessed a bit, so the spring stays centered.
If you look at the pictures, on the left side, where the car is riding at 21.25", the things jammed in at the top of the spring are at the 2nd and 3rd turn, whereas on the right side, where the car is riding at 21", the things as the top are both jammed at the 3rd turn. It would seem that if I could push the one to the 2nd turn, the spring would extend a bit and the height would move up.
I appreciate the help and thoughts.
Dan
-

collins_dan - Coveted Fifth Gear

- Posts: 1203
- Joined: 09 Jan 2006
collins_dan wrote:I don't want to defend these things, bodge or not, they have worked for many years and I'm just hoping for one more. It appears that at the top, the very center is recessed a bit, so the spring stays centered.
If you look at the pictures, on the left side, where the car is riding at 21.25", the things jammed in at the top of the spring are at the 2nd and 3rd turn, whereas on the right side, where the car is riding at 21", the things as the top are both jammed at the 3rd turn. It would seem that if I could push the one to the 2nd turn, the spring would extend a bit and the height would move up.
I appreciate the help and thoughts.
Dan
That may be well worth a try; give it a go.
If the Springs are progressive rate then it could indeed have an influence.
Judging by your Photos & the witnesses of the upper coils having made contact with one another the Springs will have a progressive rating.
Have you considered that the present set up is to compensate for the Driver being in his seat?
(Corner Weights) How does the Car measure up when you're sat in it?
Another afterthought, you're talking about 1/4" difference from side to side; how important is that?
John
Beware of the Illuminati
Editor: On Sunday morning, February 8th 2015, Derek "John" Pelly AKA GrumpyBodger passed away genuinely peacefully at Weston Hospicecare, Weston Super Mare. He will be missed.
Editor: On Sunday morning, February 8th 2015, Derek "John" Pelly AKA GrumpyBodger passed away genuinely peacefully at Weston Hospicecare, Weston Super Mare. He will be missed.
-

GrUmPyBoDgEr - Coveted Fifth Gear

- Posts: 3062
- Joined: 29 Oct 2004
Thanks John. The PO was a big guy, so I do think that the current setting was to compensate for his weight. I only weight 135 lbs and the height doesn't really change when I get in. I would guess he was 200 or so, and the car definitely moved when he got in and out.
The only thing I have to figure out is how to get a grip on it to move it. They show not signs of having been whacked with a hammer... It almost looks like something fits into the center of them, like a short crow bar, which is then pushed around. I feel like I'm missing a tool to move them. I've sent the PO an email, but am not optimistic he will recall how to move them.
The 1/4 inch is the difference between the fender covering the tire and being above the tire. When I take the car in to have the new tires mounted, I want the car to be on the high side, so that I don't have any clearance issue. I can move it down when I get home if the the clearance is fine.
Thanks for bearing with me on this. Next year at this time I hope to have pretty pictures of TTR's contemporary solution.
Dan
-

collins_dan - Coveted Fifth Gear

- Posts: 1203
- Joined: 09 Jan 2006
Dan, I have seen two types and they are cheap--$6.00 for a set of 4. What you have are spring lifts that raise the body up to 1 inch if it is a one inch square lift, and your photo looks like that is what you have. The rectangle one with one turn gives you a one inch rise and the next turn is the long side of the rectangle giving you the 1 1/2 inch rise. You need a 1/2 inch square drive to be inserted into the end and just turn them to lock them. Yours look like you will need a simple wrench to grip them. They are designed to fit the spring's shape. Now you really don't get the full rise but that is what they say. It does not change the lift no matter where you place the spacers, high or low, but you do want them to be close and equally separated. 180 degrees apart, otherwise they will push the spring to one side or the other and could cause rubbing somewhere. You do need to take the wheels off and let the spring expand and open up. The spacers can be inserted more easily. Then by using a wrench, turn them into place. Again, your photo looks like they are still compressed and would be very hard to move. When the wheel is replaced and the jack is let down, the spring will be compressed and the lifts will stay in place.
They are the poor mans method of jacking up the rear end. They say that they do not effect the handling but who knows.
The lifts only raises the body up off the tyre. If you are going for wider tires, they may still rub the wheel wells. Your pictures looks like you have much more clearance than I have. And you have not even shaved off any wheel well fiberglass.
Sarto
lotus elan 1966 S3 FHC
36/5785
LHD
36/5785
LHD
-

mac5777 - Fourth Gear

- Posts: 537
- Joined: 05 Jul 2004
I'm an old curmudgeon...... Will I do?? 

Nope I don't like it either. Very iffy.. BUT..If funds don't allow and they are staying put, ??
Not for me though.
You have been given very good advice about adjustable and smaller dia springs etc. These guys know whats what. I would (and did!) listen carefully...
Alex B....
Nope I don't like it either. Very iffy.. BUT..If funds don't allow and they are staying put, ??
Not for me though.
You have been given very good advice about adjustable and smaller dia springs etc. These guys know whats what. I would (and did!) listen carefully...
Alex B....
Alex Black.
Now Sprintless!!
Now Sprintless!!
-

alexblack13 - Coveted Fifth Gear

- Posts: 2306
- Joined: 17 Oct 2007
Good Morning Dan and all others,
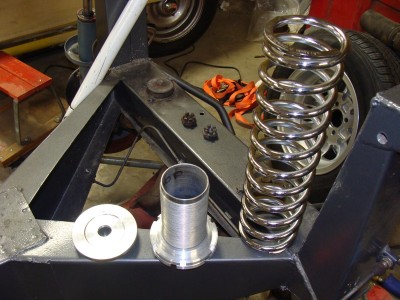
First Dan you have been given all the answers to your present state of operation with good advice. I would also think as Sarto stated they simply crank or turn to raise height and I have seen ones with the square drive insert. Simply use a socket extension and a handle to turn. Any way the main reason for my reply I am working on a pair of rear struts as we speak and thought it might be helpful to look at my process. I have taken photos in steps for better understanding.
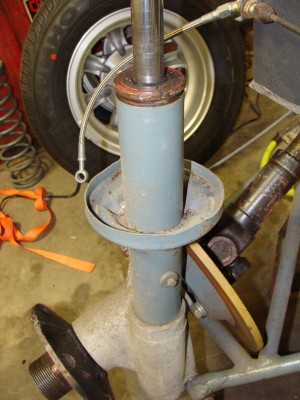
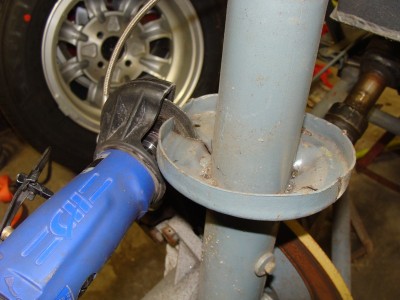
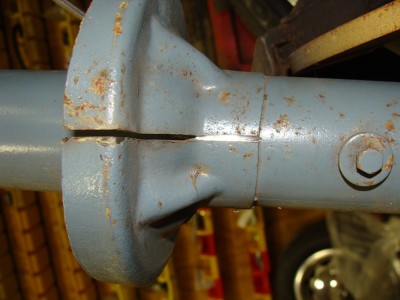
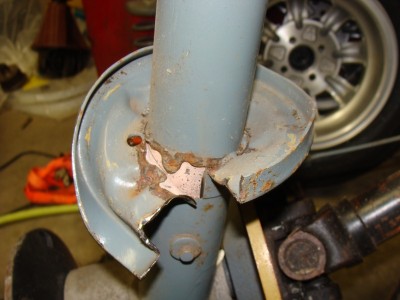
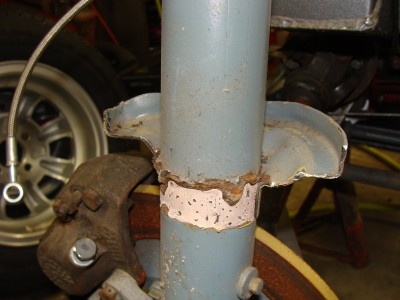
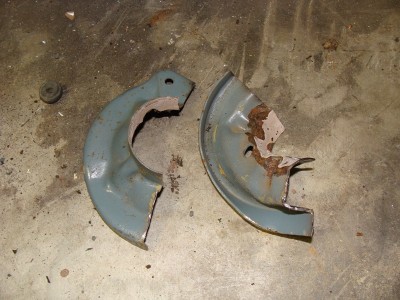
First my body is off so it is much easier to see the full operation but this is not a huge advantage as I have done this both ways. I won't go thru the steps of lowering the strut and top perch as that is straight forward. The lower perch is a little different operation and I find it easiest to take small air grinder with a 4" disc and cut into the spring perch. I make two cuts, one on each side. The trick is to not cut too deep on the strut tube and damage the tube. Once I have the cuts done I then take a large chisel and hammer in the gap of the cut to open the perch. They are brazed or silver soldered in place but with the gap being opened, the perch will start to peel off the tube. Once I get that too start I simply hit the perch with a hammer in the direction of it peeling back. It will peel off fairly easily once you get it moving.
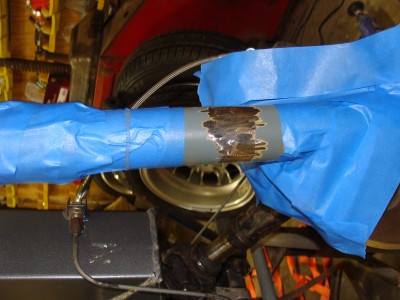
Once you have the perches off then I take small air sander with an 80 grit pad and sand the area to remove the brass and rust.
I then clean up the area and mask with tape and then prime with acid eche primer and topcoat with paint. You now have a tube ready for the adjustable spring platforms.
I have used a kit from a good supplier, which all seem to offer. I am now kind of making up my own from different parts and suppliers. I use a 2" split ring collar clamped on the tube at the bottom of the adjustable spring perch. I have used two different types of threaded tubes. The main difference is how they are held in place. One has three allen set screws at the top and the other is simply epoxied in place. The split clamp is extra insurance that they don't move.
Now that you have the bottom adjustable perch installed I then need a spring, and again I have found many venders for this. I use a spring with 125lb rate which is reasonably stiff. Anything from 95lbs up will work and is dependant on your driving taste. I have attached a photo of the label for the present set being installed.
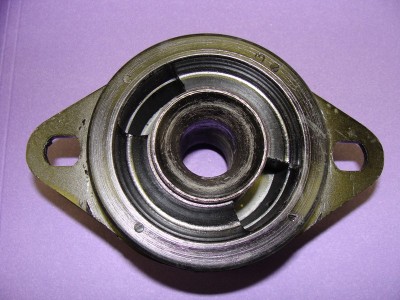
The top perch and shock nut again will come with your venders kit. One thing that I have found that you need to ask about when you purchase the kit, the design of the new replacement lotocones are different then the original units. The new ones have a machined center instead of the stamped out cone. The machined cone has much less taper on the inside and the depth of the taper is very small. Not sure how to discribe this but just be aware of this and it will become very easy to see and I will attach a photo of the new one.
I hope some of this will help as you do your conversion in the future and feel free to shout if you have further question.
One last comment I took the two struts from original to the point of the pictures in a couple hours last night.
Mark
-

memini55 - Third Gear

- Posts: 461
- Joined: 09 Jan 2004
24 posts
• Page 1 of 2 • 1, 2
Total Online:
Users browsing this forum: No registered users and 30 guests

