
Cosworth YB Turbo Into Elan

![]() Post by: prezoom » Sat Nov 19, 2016 1:52 am
Post by: prezoom » Sat Nov 19, 2016 1:52 am
Don't forget to inflate the tires with helium. I can identify with your efforts. Back in 1974, I drilled out the center of bolts, replaced all screws and fasteners with no serious stress with aluminum rivets, replaced many components with lighter ones with lots of holes where I could, even a motorcycle battery. Kept all shavings and removed hardware in coffee cans, and the end result was a Datsun Sunny under 1400 pounds/637 kg. This was with an all steel body, albeit many panels soaked in a phosphoric acid bath. I did have to ballast up to make minimum weight, using lead shot in small cloth bags, placed where they would balance the car to its best advantage.
Rob Walker
26-4889
50-0315N
1964 Sabra GT
1964 Elva Mk4T Coupe (awaiting restoration)
1965 Ford Falcon Ranchero, 302,AOD,9",rack and pinion,disc,etc,etc,etc
1954 Nash Healey LeMans Coupe
Owning a Lotus will get you off the couch
26-4889
50-0315N
1964 Sabra GT
1964 Elva Mk4T Coupe (awaiting restoration)
1965 Ford Falcon Ranchero, 302,AOD,9",rack and pinion,disc,etc,etc,etc
1954 Nash Healey LeMans Coupe
Owning a Lotus will get you off the couch
- prezoom
- Coveted Fifth Gear

- Posts: 1337
- Joined: 16 Mar 2009
![]() Post by: stevebroad » Sat Nov 19, 2016 10:42 am
Post by: stevebroad » Sat Nov 19, 2016 10:42 am
rgh0 wrote:Are you going to hollow drill the bolt shanks and cross drill the heads - you can some more weight out of those heavy titanium bolts
cheers
Rohan
What, a bit like this?

- stevebroad
- Fourth Gear

- Posts: 917
- Joined: 08 Mar 2004
![]() Post by: elanfan1 » Sat Nov 19, 2016 11:58 am
Post by: elanfan1 » Sat Nov 19, 2016 11:58 am
Hi Steve,
I lean heavily towards originality but even I am enjoying your build thread. I am in awe of the sheer volume/fine detail of work and what you've achieved to date (having built/managed the rebuilding of a standard car from burned out which took me 7 years I think I can appreciate the progress so far).
Do you have a target date for completion?
Steve
Silence is Golden; Duct Tape is Silver
Silence is Golden; Duct Tape is Silver
-

elanfan1 - Coveted Fifth Gear
- Posts: 2238
- Joined: 13 Jan 2004

![]() Post by: stevebroad » Sun Nov 20, 2016 12:37 pm
Post by: stevebroad » Sun Nov 20, 2016 12:37 pm
elanfan1 wrote:Hi Steve,
I lean heavily towards originality but even I am enjoying your build thread. I am in awe of the sheer volume/fine detail of work and what you've achieved to date (having built/managed the rebuilding of a standard car from burned out which took me 7 years I think I can appreciate the progress so far).
Do you have a target date for completion?
Been there


I have had a target date of 'next year' for the last 5 years
- stevebroad
- Fourth Gear
- Posts: 917
- Joined: 08 Mar 2004
![]() Post by: stevebroad » Sun Nov 20, 2016 9:08 pm
Post by: stevebroad » Sun Nov 20, 2016 9:08 pm
prezoom wrote:Don't forget to inflate the tires with helium. I can identify with your efforts. Back in 1974, I drilled out the center of bolts, replaced all screws and fasteners with no serious stress with aluminum rivets, replaced many components with lighter ones with lots of holes where I could, even a motorcycle battery. Kept all shavings and removed hardware in coffee cans, and the end result was a Datsun Sunny under 1400 pounds/637 kg. This was with an all steel body, albeit many panels soaked in a phosphoric acid bath. I did have to ballast up to make minimum weight, using lead shot in small cloth bags, placed where they would balance the car to its best advantage.
Tricky to find helium at trackside. As you found out, the beauty of removing weight is that you can put it back where you want it if necessary.
My Lithium battery weighs less than 1kg.
As you, aluminium where possible, otherwise titanium which are drilled except for the suspension and drivetrain ones.
Can't acid dip fibreglass, but lots of holes and sanding of inside surfaces where accessible.
- stevebroad
- Fourth Gear
- Posts: 917
- Joined: 08 Mar 2004
![]() Post by: msd1107 » Mon Nov 21, 2016 9:24 pm
Post by: msd1107 » Mon Nov 21, 2016 9:24 pm
RE: Nuts and bolts - saving weight
Depending on the fastening torque values, change to aluminum, then titanium.
Get nuts 1/8 to 1/16 smaller, tap them out to size.
Shorten nuts to 3 or so threads.
Measure the length bolts need to be to barely extend from the nut. Buy bolts that length.
Depending on the fastening torque, center drill the bolts.
Shorten the head depth. Center drill the head.
Use only hex headed nuts and bolts. Sockets are more secure when you thin the heads and nuts. Get ratchet drivers/torque wrenches to tighten/loosen.
Any more ideas?
David
1968 36/7988
-

msd1107 - Fourth Gear
- Posts: 848
- Joined: 24 Sep 2003
![]() Post by: stevebroad » Mon Nov 21, 2016 10:33 pm
Post by: stevebroad » Mon Nov 21, 2016 10:33 pm
Depending on the fastening torque values, change to aluminum, then titanium. - DON'T FORGET NYLON. DONE
Get nuts 1/8 to 1/16 smaller, tap them out to size. - HADN'T THOUGHT OF THIS ONE
Shorten nuts to 3 or so threads. - CAREFUL AS THIS CAN REDUCE TORQUE CAPABILITIES OF NUT
Measure the length bolts need to be to barely extend from the nut. Buy bolts that length. 1.5 THREADS IS RECOMMENDED. DONE
Depending on the fastening torque, center drill the bolts. - DONE
Shorten the head depth. Center drill the head. SEE ABOVE
Use only hex headed nuts and bolts. Sockets are more secure when you thin the heads and nuts. Get ratchet drivers/torque wrenches to tighten/loosen. AGREED.
- stevebroad
- Fourth Gear
- Posts: 917
- Joined: 08 Mar 2004
![]() Post by: prezoom » Tue Nov 22, 2016 4:30 pm
Post by: prezoom » Tue Nov 22, 2016 4:30 pm
12 points and jet nuts.
Rob Walker
26-4889
50-0315N
1964 Sabra GT
1964 Elva Mk4T Coupe (awaiting restoration)
1965 Ford Falcon Ranchero, 302,AOD,9",rack and pinion,disc,etc,etc,etc
1954 Nash Healey LeMans Coupe
Owning a Lotus will get you off the couch
26-4889
50-0315N
1964 Sabra GT
1964 Elva Mk4T Coupe (awaiting restoration)
1965 Ford Falcon Ranchero, 302,AOD,9",rack and pinion,disc,etc,etc,etc
1954 Nash Healey LeMans Coupe
Owning a Lotus will get you off the couch
- prezoom
- Coveted Fifth Gear
- Posts: 1337
- Joined: 16 Mar 2009
![]() Post by: stevebroad » Tue Nov 22, 2016 5:46 pm
Post by: stevebroad » Tue Nov 22, 2016 5:46 pm
prezoom wrote:12 points and jet nuts.
That's the way to go. Not cheap but you can't take it with you, as far as I know.
- stevebroad
- Fourth Gear
- Posts: 917
- Joined: 08 Mar 2004
![]() Post by: types26/36 » Tue Nov 22, 2016 5:56 pm
Post by: types26/36 » Tue Nov 22, 2016 5:56 pm
stevebroad wrote: but you can't take it with you, as far as I know.
Have you tried travellers cheques......failing that dont go
Brian
64 S2 Roadster
72 Sprint FHC
64 S2 Roadster
72 Sprint FHC
-

types26/36 - Coveted Fifth Gear
- Posts: 3873
- Joined: 11 Sep 2003
![]() Post by: stevebroad » Tue Nov 22, 2016 7:58 pm
Post by: stevebroad » Tue Nov 22, 2016 7:58 pm
types26/36 wrote:stevebroad wrote: but you can't take it with you, as far as I know.
Have you tried travellers cheques......failing that dont go
Looked into those, but I kept hitting a dead end.
- stevebroad
- Fourth Gear
- Posts: 917
- Joined: 08 Mar 2004
![]() Post by: stevebroad » Sun Dec 11, 2016 5:26 pm
Post by: stevebroad » Sun Dec 11, 2016 5:26 pm
Finished seat brackets for the new seat today. Bought a pair of OMP 6mm thick brackets as a starting point. Bloody heavy but I thought that I could remove at least a Kg from them. They needed to be trimmed to clear the seat at both ends and could do with a few more holes
After a bit of experimenting and trial fitting I settled on what I needed to remove.
You may be thinking, why have I painted them? Paint has a weight, but it also disguises the many imperfections and shoddy finish They will be mostly hidden so I decided not to spend too much time on them. A total of 740gms removed. Not the 1Kg I was looking for but decided that stiffness was more important than lightness in this situation.
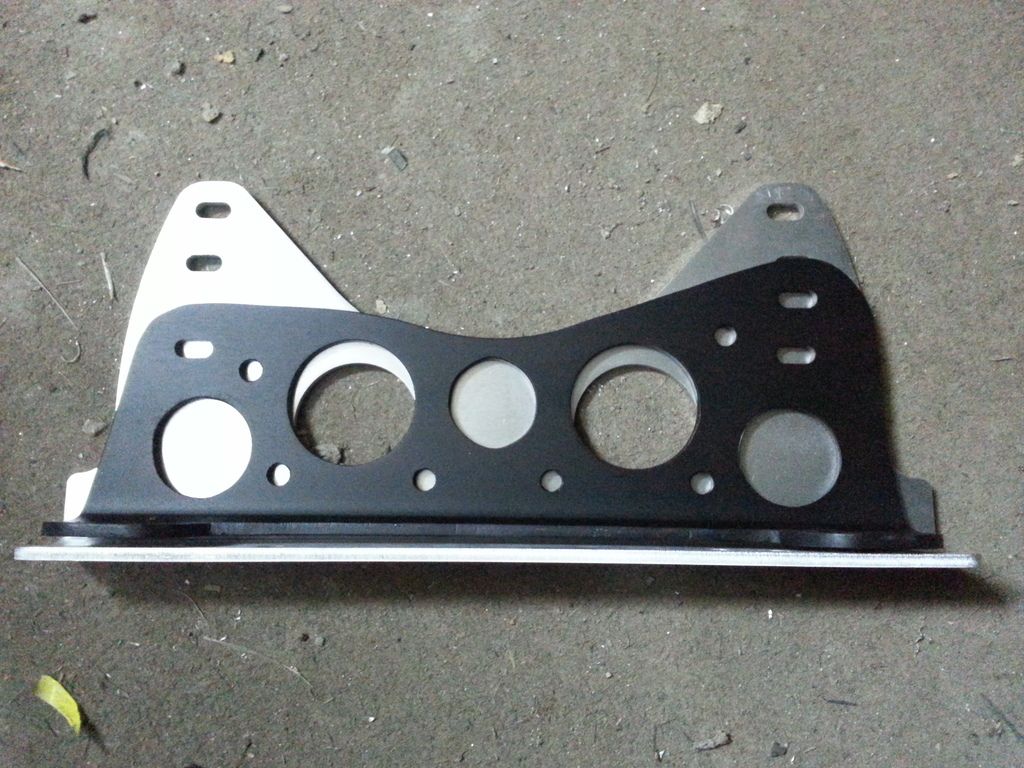
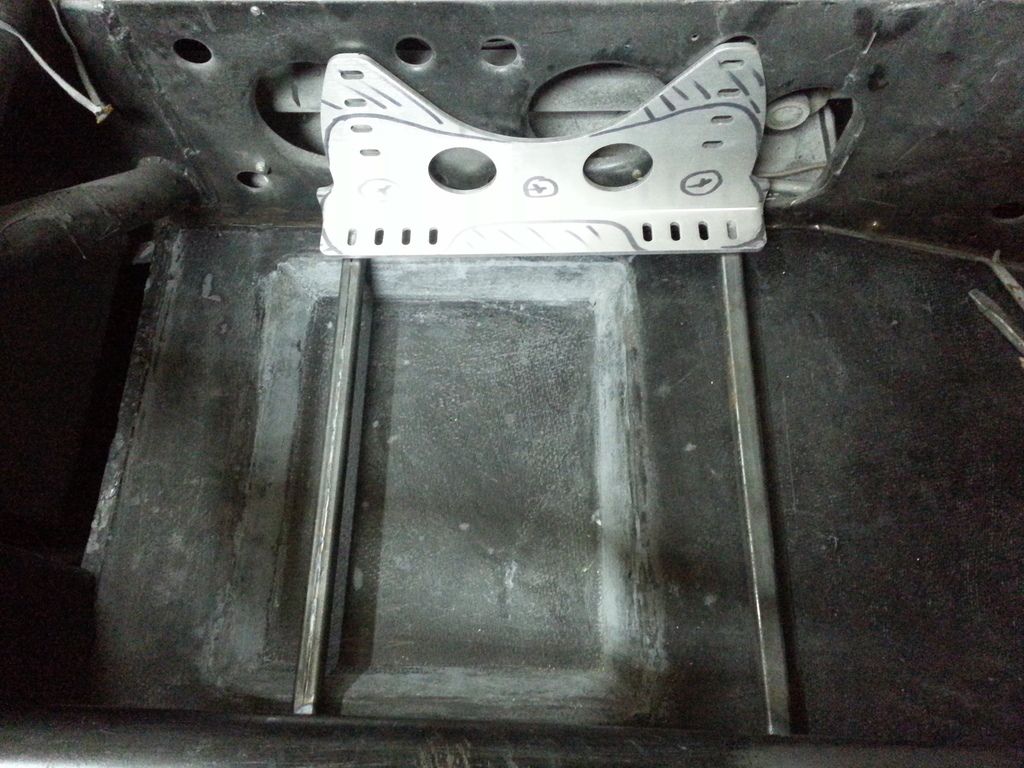
These brackets will sit on steel supports running from the sill roll bar to the tunnel. If you are wondering why the square tubes aren't centred over the lowered section of the floor, this is because this was originally designed to suit the seat I was making. The Reverie seat has a different fixing configuration, but it still fits in the hole
After a bit of experimenting and trial fitting I settled on what I needed to remove.
You may be thinking, why have I painted them? Paint has a weight, but it also disguises the many imperfections and shoddy finish

These brackets will sit on steel supports running from the sill roll bar to the tunnel. If you are wondering why the square tubes aren't centred over the lowered section of the floor, this is because this was originally designed to suit the seat I was making. The Reverie seat has a different fixing configuration, but it still fits in the hole

- stevebroad
- Fourth Gear
- Posts: 917
- Joined: 08 Mar 2004
![]() Post by: stevebroad » Mon Dec 12, 2016 1:26 pm
Post by: stevebroad » Mon Dec 12, 2016 1:26 pm
A couple of photos and a video for Dave H.
Click image to see rather long and boring video of holes being milled

Click image to see rather long and boring video of holes being milled
- Attachments
-
-
 Viewed 755 times")
 Viewed 755 times")
- stevebroad
- Fourth Gear
- Posts: 917
- Joined: 08 Mar 2004
![]() Post by: prezoom » Mon Dec 12, 2016 3:30 pm
Post by: prezoom » Mon Dec 12, 2016 3:30 pm
Spot on with paint. I anodized the aluminum panels and other bits. Door panels were carbon fiber, which I mixed blue dye into the epoxy. When the sun hit it, it looked like gun bluing. Did the same with the front air dam.
Rob Walker
26-4889
50-0315N
1964 Sabra GT
1964 Elva Mk4T Coupe (awaiting restoration)
1965 Ford Falcon Ranchero, 302,AOD,9",rack and pinion,disc,etc,etc,etc
1954 Nash Healey LeMans Coupe
Owning a Lotus will get you off the couch
26-4889
50-0315N
1964 Sabra GT
1964 Elva Mk4T Coupe (awaiting restoration)
1965 Ford Falcon Ranchero, 302,AOD,9",rack and pinion,disc,etc,etc,etc
1954 Nash Healey LeMans Coupe
Owning a Lotus will get you off the couch
- prezoom
- Coveted Fifth Gear
- Posts: 1337
- Joined: 16 Mar 2009
Total Online:
Users browsing this forum: No registered users and 13 guests