Fitting Plus 2 ABS crash pad
15 posts
• Page 1 of 1
I have bought one of the rigid ABS crash pads (from Sue Miller, but I gather they are all the same irrespective of supplier).
My old crash pad was really not useable, I am aware that people have commented that these ABS ones are a pretty poor fit but clearly they can be cut and can be moulded to shape with a hot air gun. Since I will have it leather covered I?m not too worried about having to do some modest reshaping.
It is clearly the wrong shape at the ends where in meets the A pillars. I could try to reshape it with heat or reduce some of its rigidity by cutting and shaping. Has anyone been here before and what was their approach? Car is currently stripped and I have a week to do this before it goes off for painting. I don?t want to be messing about with it when the car comes back all nice and shiny.
Nic
- NYK
- Third Gear

- Posts: 428
- Joined: 27 Jul 2017
I had mine upholstered and i asked them to leave extra material along the leading edge. I fitted it before the windscreen and seats went in ! It looked fine at the time........
It's not quite right as it needs leading edge cut back in the middle as it fouls the windscreen rubber here .
The effect is that the crash pad is tilted too far backward and obscures the handbrake warning light a little ... but i didn't realise at the time 'cos the seats weren't in!! I'm living with it , as you do...
RichC
-

RichC - Fourth Gear

- Posts: 829
- Joined: 28 Apr 2009
I?ve been fighting mine all day, I find that apart from being short to the windscreen at the outer edges (I think you refer to this in the trimming) it is too wide and simply did not fit the A pillars. I started by doing some subtle heat adjustments, then my adjustments became less subtle and involved some material relief at the sides. If it sounds brutal then I have to say it was. I fits better now but I will need to skim the sides with a bit of flexible bumper filler prior to covering it. I?ve got to say, at ?180 delivered, it?s very poor value.
- NYK
- Third Gear

- Posts: 428
- Joined: 27 Jul 2017
I?m just about to fit mine in the next couple of days once I?ve done the last couple of bits on the dash and wiring.
When fitting it I have a question on the demister vents, how are they secured, is it screws from the top through the vent, through the pad, through the fibreglass dash support and finally into the actual fan shaped vent duct. Should these be self tapping screws, if so what do the screws tighten into, should they just push through clearance holes in everything and only be threaded into the duct itself or should they be bolts with nuts on, if so how do you get to the nuts. So really it?s a how on earth do you screw it all together please!
Thanks in anticipation!
Change is inevitable, except from a vending machine!
- Bigbaldybloke
- Fourth Gear

- Posts: 894
- Joined: 16 May 2017
On an ABS crashpad I got, I felt like it was just too thick and heavy looking for me and this in addition to having to really cut into the sides to get it to fit made me give up on it and I am in the process of making one out of fiberglass. In the current crashpad that I have in there which is a widened Europa one that?s very padded, I put the screws through to the vents and on the vents had U-shaped clips that secured the self tapping screw when it came through. Gordon Sauer
- Gordon Sauer
- Fourth Gear

- Posts: 679
- Joined: 20 Aug 2004
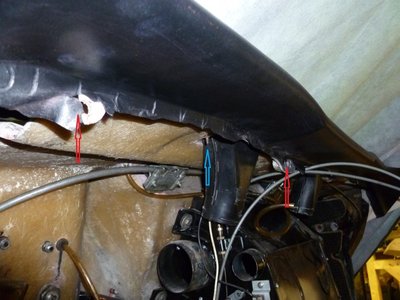
Hope the photo helps, you may have to zoom in.
There is a metal U clip on the crash pad, see the blue arrow.
The plastic Vent duct goes on top of the crash pad and then the metal vent grid.
The screw goes through them into the U clip to secure both parts.
There is a metal U clip on the crash pad, see the blue arrow.
The plastic Vent duct goes on top of the crash pad and then the metal vent grid.
The screw goes through them into the U clip to secure both parts.
Trevor
1968 Elan +2 50/0173
1968 Elan +2 50/0173
-

TeeJay - Fourth Gear

- Posts: 579
- Joined: 30 May 2007
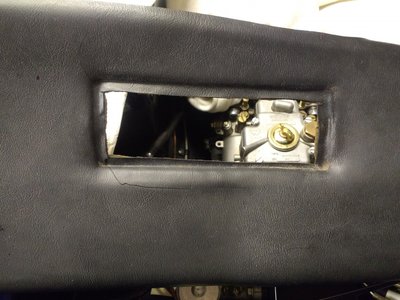
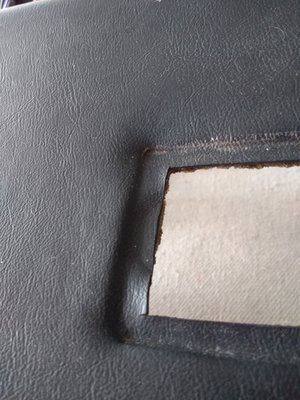
My 68 +2 original crashpad. There's no holes for screws, the grille cutout is wide enough. The fibreglass dash support below has holes that look like they take a self tap screw. The previous post shows the demist duct has been threaded up through the hole so it sits above the dash support.
I've yet to fit, after I repair that crack.. fingers crossed..
I've yet to fit, after I repair that crack.. fingers crossed..
1968 Elan plus 2 - project
2007 Elise S2 [modified with a Hethel 70th sticker (yellow)]
2000 Elise S1 - Sold
2007 Elise S2 [modified with a Hethel 70th sticker (yellow)]
2000 Elise S1 - Sold
- wotsisname
- Third Gear

- Posts: 487
- Joined: 24 Jun 2015
I?ve just looked at the R Dent online parts list and although it?s not really detailed about assembly order, it shows screws for attaching the demister grill to the fibreglass section under the crash pad and doesn?t show the demister duct on the same exploded diagram. Certainly the holes in the fibreglass on mine appeared to be threaded where a self tapping screw has been secured in it. Also my demister ducts won?t fit through the holes in the fibreglass such that the screw holes would all line up with the duct on top of the fibreglass. But, assembly would be a whole lot easier with the ducts on top. Are people fitting the crash pad with the dash completely out or with it loosely in place and just needing pushing back an inch or so and the securing bolts fitting once the pad is secured in place. My dash is loosely in place but not secured so can be pulled forward a few inches. All the electrics, radio etc are in place and live if I connect the battery terminal.
Change is inevitable, except from a vending machine!
- Bigbaldybloke
- Fourth Gear

- Posts: 894
- Joined: 16 May 2017
My +2 (Jan 1968), still has the original crashpad and I have owned the car since August 1975 
It is possible that a previous owner fitted the U clips as the thread in the crashpad may have been stripped.
But if the nozzles are not fitted on top of the crashpad, but underneath, then the nozzles would have to be threaded
The information in the official Workshop manual is clear; Section P page 5; in that the screws go through the demist grills and nozzles. It also states that the nozzles are handed.
See attached.
Trevor
1968 Elan +2 50/0173
1968 Elan +2 50/0173
-

TeeJay - Fourth Gear

- Posts: 579
- Joined: 30 May 2007
Thanks TeeJay makes sense having the ducts above the fibreglass dash support section and the screws being secured into the fibreglass. One thing is not clear though, starting from the top and going down is the order metal grill, crash pad cover, demister duct, fibreglass section, or is it metal grill, demister duct, crashpad cover, fibreglass section.
I?m assuming the grill would pull down onto the vinyl crash pad and cover the duct nicely whichever order they were in?
I?ve not tried it yet as I?m just finalising the dash wiring and am having problems with the tacho and electronic ignition, but that?s in hand with Spiyda, but it means I still need easy access to the back of the tacho. Also my demister tubing was brittle and cracked when I cleaned it and it seems in short supply from the usual stockists but I?ve now sourced some on eBay. Father in laws 92nd birthday this weekend so will be taking a few days off the Lotus!
Change is inevitable, except from a vending machine!
- Bigbaldybloke
- Fourth Gear

- Posts: 894
- Joined: 16 May 2017
This isn't exactly how l was expecting it to go together... But here goes.
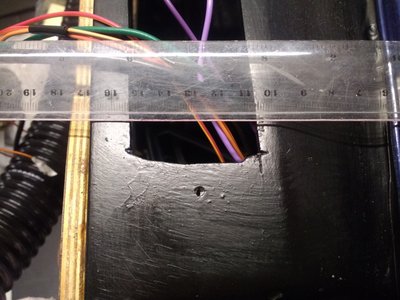
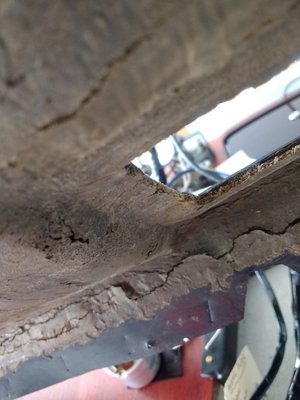
The demist duct can only be fitted from below. The short side faces forward and you have to put the side nearest the door up through the hole first. The other way round fouls the dash.
Based on indents on my craspad I would say the duct sits on the crashpad, but only just. My dash was originally fixed to the crashpad.. if I keep this feature then I'll need a black belt in origami to fit it all together.
1968 Elan plus 2 - project
2007 Elise S2 [modified with a Hethel 70th sticker (yellow)]
2000 Elise S1 - Sold
2007 Elise S2 [modified with a Hethel 70th sticker (yellow)]
2000 Elise S1 - Sold
- wotsisname
- Third Gear

- Posts: 487
- Joined: 24 Jun 2015
My 70+2S was assembled exactly as shown in wotsisname's pictures. The fiberglass support panel has the U-clips (sheet nuts) installed. I know of very few places on my car where screws go into fiberglass only. Only the rain gutters and the headliner bow clips come to mind.
I have a can of Polyvance 2050-9 Padded Dash Filler on the way and some four way stretch vinyl on hand. Too many horror stories about the replacement crash pads for me.
I have a can of Polyvance 2050-9 Padded Dash Filler on the way and some four way stretch vinyl on hand. Too many horror stories about the replacement crash pads for me.
Bud
1970 +2S Fed 0053N
"Winnemucca - says it all really!!"
1970 +2S Fed 0053N
"Winnemucca - says it all really!!"
- Bud English
- Coveted Fifth Gear

- Posts: 1081
- Joined: 05 Nov 2011
No clips on mine, but it also goes together as stated above. Unlike Bud's car, mine had screws into fibreglass all over the interiour.
1970 Elan Plus 2 (not S) 50/2036
2012 BMW R1200GS
"It just wouldn't be a complete day if I didn't forget something!" -Me
2012 BMW R1200GS
"It just wouldn't be a complete day if I didn't forget something!" -Me
-

The Veg - Coveted Fifth Gear

- Posts: 2341
- Joined: 16 Nov 2015
Bigbaldybloke wrote:One thing is not clear though, starting from the top and going down is the order metal grill, crash pad cover, demister duct, fibreglass section, or is it metal grill, demister duct, crashpad cover, fibreglass section.
Trust the weekend break went well.
The crashpad is best fixed in position, this assumes that any adjustments required to fit a replacement have been carried out. My original has never been removed.
The dash must be unsecured and pulled forward to allow access.
The positioning of items starting from the top is, fixing screw, metal grill, demister nozzle, crashpad.
Metal grill does cover the ?flange? of the demister nozzle and the ?flange? is on the top of the crashpad.
As wotsisname says, it is fitted from below the crashpad with the ?flange pushed through the aperture of the crash pad.
Note: As I said above, the nozzle is handed and in 2 ways.
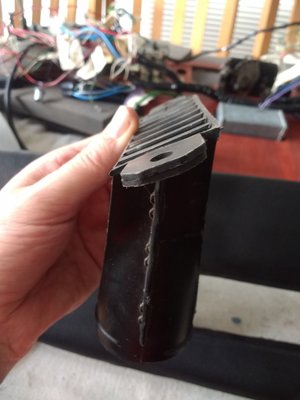
First: - As per wotsisname first photo, a short and long side.
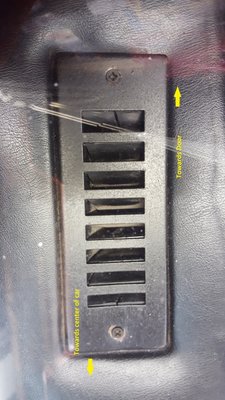
Second: - The Direction of the air veins in the nozzle are different from side to side. The vain that is almost vertical is in the centre of the car and the one which is the most angled is towards the sides of the car.
See photo below, which is for a RH drive and is the passenger vent, looking through the windscreen. Look at the angles of the veins. Sorry I cannot position the photo horizontal.
Trevor
1968 Elan +2 50/0173
1968 Elan +2 50/0173
-

TeeJay - Fourth Gear

- Posts: 579
- Joined: 30 May 2007
15 posts
• Page 1 of 1
Total Online:
Users browsing this forum: smiths everest and 24 guests

