Water return hose
37 posts
• Page 2 of 3 • 1, 2, 3
The bulb needs to be free from the adapter for the adapter to turn and be removed and replaced. Otherwise you twist the capillary tube and it breaks. As it looks like you successful removed the bulb clamping nut and removed and replaced the adapter you should be able to replace the adapter OK .
If I recall correctly the adapter always had a very short thread into the head and an aluminium washer as a seal. I would clean it all up and seal with teflon tape (including the face of the hex to the head) and remove the old aluminium washer to increase the thread engagement if you want to reuse the old adapter.
Replacement adapter i have purchased have had longer engagement threads.
cheers
Rohan
-

rgh0 - Coveted Fifth Gear

- Posts: 8831
- Joined: 22 Sep 2003
Bud English wrote:Looks like most of the adapter threads are still in the head. I don't off hand remember what what the adapter threads are (3/8 BSP to 5/8 UNF ??), but I think they are available. Unless, of course, you don't think the bulb will survive removing it from the adapter. That would be expensive if it didn't.
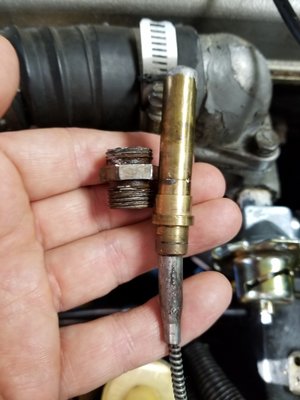
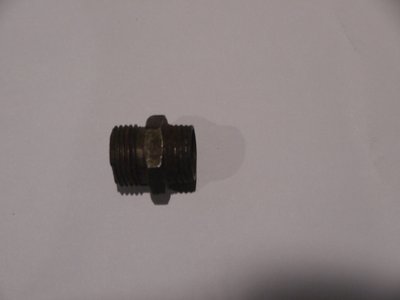
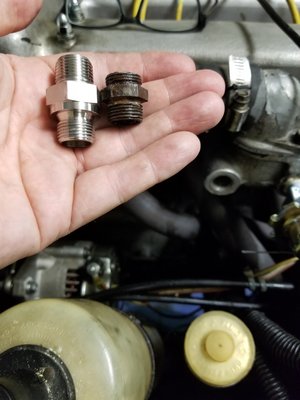
If you are suggesting that part of the adaptor broke off and remained in the head section, hadn't thought of that. There is some tightness in there, but I just assumed that was to hold the bulb snug. Your comment would explain why there is very little apparent thread in the head. See the picture of my adapter below - does it look shorter than usual? If so, I'm guessing what is left in the head is corroded in solidly - any ideas or tips for removal?
Henry
69 Elan S4
65 Seven S2
69 Elan S4
65 Seven S2
- SENC
- Coveted Fifth Gear

- Posts: 1058
- Joined: 30 Dec 2015
Your adapter looks exactly like the adapter I first pulled out of my Elan in around 1975. There was nothing inside the head but crud build up so I assumed this was standard. Maybe it was or maybe the thread was originally longer and some DPO in the first few years of my cars life had broken of the threads and cleared out the broken portion from the hole. I replaced it with a proper thread depth adapter locally made in the early 90's after getting the original to seal on the various different heads i was using as i built various race engines became to difficult after 15 years.
......So dont give up now
but since you have it all apart, buy a new adapter with the correct threads and thread engagement depth. The one I have is Brass with is better than the original aluminium one
cheers
Rohan
......So dont give up now
but since you have it all apart, buy a new adapter with the correct threads and thread engagement depth. The one I have is Brass with is better than the original aluminium one
cheers
Rohan
-

rgh0 - Coveted Fifth Gear

- Posts: 8831
- Joined: 22 Sep 2003
Normaly the adapter in the Head is never removed 
If i remove the Temp Bulb i put a spanner on the adapter in the Head so it is not disturbed and second spanner on the fitting that holds the Bulb in the Adapter.
A bit late now but be very careful with the thread in the alloy Head.
Alan
ps. i've only seen brass Adapters
If i remove the Temp Bulb i put a spanner on the adapter in the Head so it is not disturbed and second spanner on the fitting that holds the Bulb in the Adapter.
A bit late now but be very careful with the thread in the alloy Head.
Alan
ps. i've only seen brass Adapters
Alan.b Brittany 1972 elan sprint fhc Lagoon Blue 0460E
- alan.barker
- Coveted Fifth Gear

- Posts: 3711
- Joined: 06 Dec 2008
I probably should have stated that I have a later plus 2 and might not know what I was talking about. 
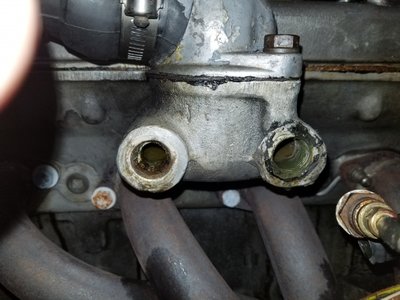
I was basing it on what shows in your picture and forum threads about swapping the locations of the heater return hose fitting and temp senders around for clearance issues. I assumed all the heads were machined the same. That's not the case as discussed here... lotus-twincam-f39/temp-sender-thread-t17539.html#p91620. However the adapter threads shown in the referenced thread appear to be much longer than yours. You don't have many threads holding that in if you have a sealing washer.
I was basing it on what shows in your picture and forum threads about swapping the locations of the heater return hose fitting and temp senders around for clearance issues. I assumed
Bud
1970 +2S Fed 0053N
"Winnemucca - says it all really!!"
1970 +2S Fed 0053N
"Winnemucca - says it all really!!"
- Bud English
- Coveted Fifth Gear

- Posts: 1081
- Joined: 05 Nov 2011
Thanks all - I've ordered a new union/adaptor from RD Enterprises - will post side by side pictures when it arrives for comparison and we'll all learn together. Based on the pictures in the thread Bud linked, my guess is the union will be longer than mine and I'll find I need to clean out the threads in the head in some way.
Henry
69 Elan S4
65 Seven S2
69 Elan S4
65 Seven S2
- SENC
- Coveted Fifth Gear

- Posts: 1058
- Joined: 30 Dec 2015
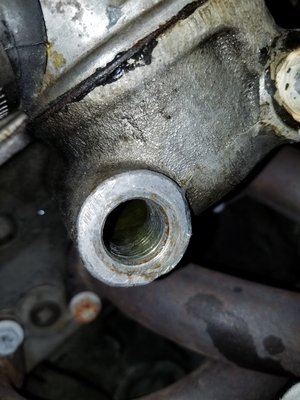
A replacement union from RD Enterprises arrived today, and though it is clearly different than the original it is also clear that the threads should go more deeply in the head than mine. So I am definitely concluding that some of the old union remains inside the head, corroded to the threads. I guess the next step is to remove the thermostat to get another vantage point and to try to figure out how to remove the old remains without damaging the head.
Henry
69 Elan S4
65 Seven S2
69 Elan S4
65 Seven S2
- SENC
- Coveted Fifth Gear

- Posts: 1058
- Joined: 30 Dec 2015
Take a look at your local big box hardware store for a tool used to remove broken off sprinkler risers that are threaded into a threaded fitting. They look like a tapered reverse reamer, but will bite into the inside of the broken off piece. Commonly used with plastic pipe. There is also another tool that has an eccentric in its center that swings out when turned in a removal direction, locking the tool in the broken off part. These may be harder to find in a small enough size to fit inside the broken off adapter, but the internet may be your friend.
Rob Walker
26-4889
50-0315N
1964 Sabra GT
1964 Elva Mk4T Coupe (awaiting restoration)
1965 Ford Falcon Ranchero, 302,AOD,9",rack and pinion,disc,etc,etc,etc
1954 Nash Healey LeMans Coupe
Owning a Lotus will get you off the couch
26-4889
50-0315N
1964 Sabra GT
1964 Elva Mk4T Coupe (awaiting restoration)
1965 Ford Falcon Ranchero, 302,AOD,9",rack and pinion,disc,etc,etc,etc
1954 Nash Healey LeMans Coupe
Owning a Lotus will get you off the couch
- prezoom
- Coveted Fifth Gear

- Posts: 1337
- Joined: 16 Mar 2009
Good call Craven. No magnetism, so concluded it was gunk. Used a screw extractor to get a little bite into it and think it was crystallized antifreeze and gunk. Totally solidified and not terribly reactive to new antifreeze or to simple green, so scraped out what I could with dental tools until it was essentially flush with the peaks of the threads. Didn't have a tap the right size, so decided to experiment with the new union. At the start I could only turn it 3 flats before getting stuck. Worked it literally 1 flat at a time, backing out and suctioning the crap out of the head and cleaning the union threads with each flat. Finally got to almost 30 flats (5 full rotations) until it was in deep enough to seat against the aluminum washer. Cleaned it out and will install with plumbing sealant tomorrow. Thanks all for your help.
Henry
69 Elan S4
65 Seven S2
69 Elan S4
65 Seven S2
- SENC
- Coveted Fifth Gear

- Posts: 1058
- Joined: 30 Dec 2015
Little concern over length of your new adapter, I think the original was kept short in order the maximum length of temperature bulb is in the water.
If shrouded by the adapter you may measure head temperature not water temperature, but looks if you are doing a nice job.
If shrouded by the adapter you may measure head temperature not water temperature, but looks if you are doing a nice job.
- Craven
- Coveted Fifth Gear

- Posts: 1634
- Joined: 14 Sep 2013
Craven wrote:Little concern over length of your new adapter, I think the original was kept short in order the maximum length of temperature bulb is in the water.
If shrouded by the adapter you may measure head temperature not water temperature, but looks if you are doing a nice job.
Interesting point. I'll inspect with that in mind before installing tomorrow, but my recollection is that the bulb still protruded pretty well and that there is a slight gap around it within the union.
Henry
69 Elan S4
65 Seven S2
69 Elan S4
65 Seven S2
- SENC
- Coveted Fifth Gear

- Posts: 1058
- Joined: 30 Dec 2015
37 posts
• Page 2 of 3 • 1, 2, 3
Total Online:
Users browsing this forum: stugilmour and 30 guests

