Control Cable Replacements
13 posts
• Page 1 of 1
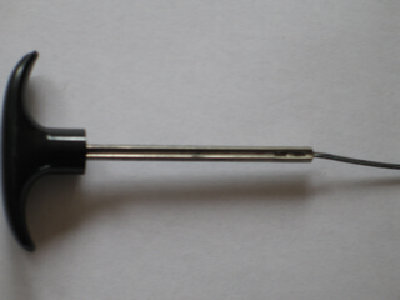
I'm enquiring if there is any experience in replacing control cables (specifically bonnet release, Plus 2S boot release, choke) whilst retaining the original plastic pull handle. Is there any classic specialist that can perform this task.
Note I have looked at the "new" replacement cables complete with handles available in the UK. They are look out of place and nasty whilst also not having the correct "script".
Regards
Gerry
Note I have looked at the "new" replacement cables complete with handles available in the UK. They are look out of place and nasty whilst also not having the correct "script".
Regards
Gerry
- gerrym
- Fourth Gear

- Posts: 894
- Joined: 25 Jun 2006
Hi Gerry
Replace! These are Rover 2000 items, with 'bonnet pull' written on. I've bought a few from eBay over the past few months to replace my fleet's tarnished items. Usually about a fiver each, maybe ?10 for new-old-stock.
Remember also that the choke knob / cable is a Cortina Mk 1 item....they come up on eBay from time to time.
Don't throw the originals away though. If Sue Miller can get them repaired then they are worth hanging on to.
Mark
-

Elanintheforest - Coveted Fifth Gear

- Posts: 2941
- Joined: 04 Oct 2005
Mark
Come on,it's about time you gave us your list,I've seen the printed list of what comes off what but you seem to have a more complete list??
John
Come on,it's about time you gave us your list,I've seen the printed list of what comes off what but you seem to have a more complete list??
John
-

john.p.clegg - Coveted Fifth Gear

- Posts: 5745
- Joined: 21 Sep 2003
I haven't got a list John, 'onest! Apart from the stuff in the books, the only other Plus 2 bits I know about are the door 'check straps' (underneath the door to stop the door opening too wide) which are also Rover 2000, and the early coat hooks and interior lights, which are Cortina. i bought a pair of check straps a few weeks ago, new-old-stock, for ?8...well chuffed!
I'm restoring a very early Plus 2, and still can't find what the door mechanisms came from, but they must be common to something. I've had to buy 2 more early cars, which had been stripped of all their valuables, to get all the door bits and chrome bits I needed. So I have a good line in crap early bodyshells and heaters now! And a few knackered seats....
Mark
-

Elanintheforest - Coveted Fifth Gear

- Posts: 2941
- Joined: 04 Oct 2005
Mark, thanks for tips, think I will try Susan Miller.
My tips for parts are Classic Mini Mark II LHD for a new steering rack (upside down). Had to get a new rubber gaitor this week for this rack. No problem, readily available QH part from Mini specialists. For a radiator, am using a Nisens parts for loads of Volkswagens (Golf Mark II, Passat etc). Replacements are about ?70 new. Xsectional area is +40% compared to Stanpart job. It's sitting on rubber bobbins which originally were from a Mini (exhaust). An advantage is that it can be mounted forward just inside the nose, so as to clear the bonnet. This gives good access to front of engine such as distributor, cassette water pump if you have one, fan belt, etc
Regards
Gerry
- gerrym
- Fourth Gear

- Posts: 894
- Joined: 25 Jun 2006
gerrym,
The cable can be replaced DIY. The shaft is hollow for a distance and the cable is inserted and soldered in place.
Removal might be a little tricky because to melt the retaining solder you have to heat the shaft and you don't want to damage the handle. For replacement maybe tin the end of the cable, clean the bore with a suitable drill, flux, insert the end, and resolder, or maybe clean the bore and end of the cable and epoxy it in place. The later reassembly using epoxy avoids using heat sufficient to melt the solder and its risk to the plastic handle.
Bill
- bill308
- Fourth Gear

- Posts: 769
- Joined: 27 May 2004
I had to replace the boot release cable on my plus 2 and simply brought a universal mountain bike brake cable replacement kit from Halfords. The kit had two lengths of cable in with pre-fixed ends on them, one of which is in line with cable. I simply pushed the metal bit out of the plastic handle and slide in the new cable and the end fitted fine. Plus an outer sleeve complete with end fittings. Then just went ahead and fitted as normal. One of the benefits of this kit is that the cable is PTFE coated and is therefore is smooth in operation and and the outer sleeve protects the innter cable from corrosion. Overall the retrofit is very robut, as one would expect from moutain bike parts.
Andy
Andy
- Attachments
Last edited by handi_andi on Fri Jul 31, 2009 9:52 pm, edited 1 time in total.
Live life to the fullest - that's why I own a Lotus
- handi_andi
- Third Gear

- Posts: 402
- Joined: 04 Feb 2006
Hi folks,
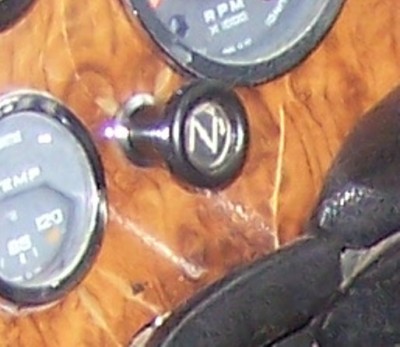
Please tell me what the choke knob should look like-I have a 1972 S130.
Martin B
Please tell me what the choke knob should look like-I have a 1972 S130.
Martin B
Time flies like an arrow; fruit flies like a banana.
72 Europa Special, 72 Sprint, 72 Plus 2
72 Europa Special, 72 Sprint, 72 Plus 2
- martinbrowning
- Third Gear

- Posts: 320
- Joined: 07 Jun 2007
Not the best picture I know, but this is the choke knob I have in my 1972 Plus 2 S130. Hope it helps.
Cheers
Andy
Cheers
Andy
Live life to the fullest - that's why I own a Lotus
- handi_andi
- Third Gear

- Posts: 402
- Joined: 04 Feb 2006
13 posts
• Page 1 of 1
Total Online:
Users browsing this forum: No registered users and 30 guests


