Windscreen Finisher Trim - photos please
5 posts
• Page 1 of 1
Hi I have a later plus 2 which uses the bonded screen with the nasty plastic finishing strip.
I'm preparing for a respray and was thinking of trying to use the stainless surround trim which I have sourced.
I have read about the screen mounting lip recess being bigger for the bonded screen therefore meaning I am unable to use the original rubber seal suited to the stainless surround.
I would guess however that I could simply set the stainless surround into the bonding goo.
I've had a fiddle with the trim and dont seem to be able to get it to sit close to the body and screen. Does anybody have any close up pictures of the finish achieved with the stainless surround. I'm thinking there must be rubber on show either side of the trim or the difference in mounting recess on my later car is causing alignment problems.
Has anybody used the stainless surround in the original or non original manner? I know I'm not going to use it correctly, but I would like to investigate further.
Pictures of seals / windscreen mounting lip ( early and late ) / trim / finish would be appreciated.
Barry.
Last edited by barrydoran on Thu Jun 25, 2009 12:55 pm, edited 1 time in total.
- barrydoran
- First Gear

- Posts: 24
- Joined: 20 Sep 2003
Hi Barry...you've prompted me into action!
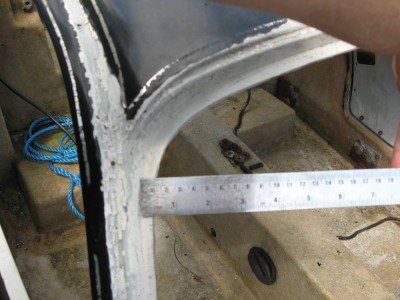
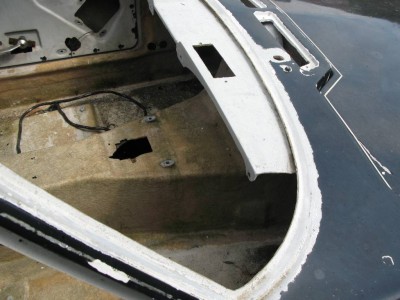
Bottom line is that it's not going to be a simple job to do. i figured that if you trimmed the late shell aperture to the early shell dimensions, then fit the correct rubber for the metal surround, the job would be done. Unfortunately, the late shell doesn't have the flange running along the bottom...it's solid.
The flange on the early car is approx 10mm, whilst on the later car it's 20mm. That's fine for the sides and top, but you'd have to do a lot of work to 'make' a flange on the bottom.
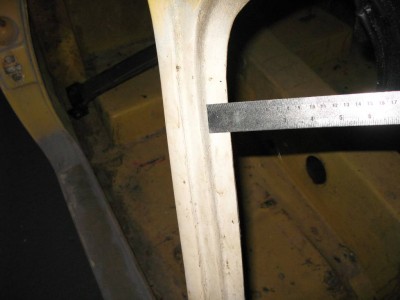
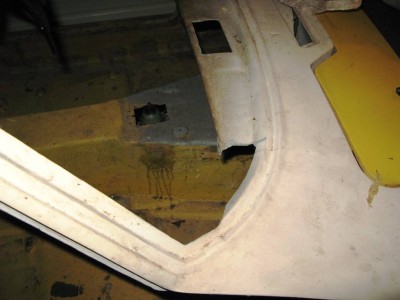
The other photos show detail of the metal strip fitted. These were put up a few moons ago from another contributor in Australia with an early car. As you can see, the metal pieces seem to 'sit' on a few mm's of rubber. As you know, the metal pieces have a deep flange to sit in the rubber seal, which would go below the level of the glass. You'd probably have to grind the flange back on the metal trim as well.
I can't see that you could do a better job than a well fitted plastic trim. If you take your time, soak the trim in a bucket of hot water and fit it on a nice sunny day, you can get very good results. And if you do that, you can sell me the metal trim for my 'new' early car!!
Good luck...Mark
-

Elanintheforest - Coveted Fifth Gear

- Posts: 2941
- Joined: 04 Oct 2005
Thanks for the info Mark
So the rubber soes portrude from under the stainless by quite a lot.
Does the later shell also have the double lip effect at the top of the screen?
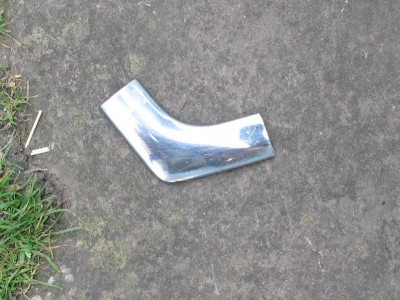
Looking at those corner peices Im not convinced I have the right ones for the surround. From memory mine are more angular, but still different from the plastic trim ones.
anybody got any other pictures, perhaps close up of the corner pieces ?
Can you still buy the plastic trim in the correct width ?
Barry.
- barrydoran
- First Gear

- Posts: 24
- Joined: 20 Sep 2003
My car is a late 1972 and uses the bonded screen which is set within the silver plastic surround (which I assume is clear plastic with a foil laid in) and has quite angular s/s corner pieces.
I had the old scratched screen replaced last year and the only place I could get a new silver plastic surround was from Sue Miller, which fitted very well and does look smart.
MJS.
I had the old scratched screen replaced last year and the only place I could get a new silver plastic surround was from Sue Miller, which fitted very well and does look smart.
MJS.
- Attachments
-
- screen surround silver plastic.JPG (13.71 KiB) Viewed 991 times
ZARDE the 130/5.
-

M.J.S - Second Gear

- Posts: 166
- Joined: 21 May 2008
The corner piece in the picture is the correct one....here's a picture of mine.
You should have three main pieces to the metal trim. A long piece that goes along the bottom of the windscreen, and two bent pieces, each of which goes up the pillar and half way across the top of the screen. The joining piece is used for the curve at the bottom of the screen.
The later shell doesn't have a double lip at the top....even more reason not to try and modify it!
Mark
-

Elanintheforest - Coveted Fifth Gear

- Posts: 2941
- Joined: 04 Oct 2005
5 posts
• Page 1 of 1
Total Online:
Users browsing this forum: smo17003 and 29 guests

