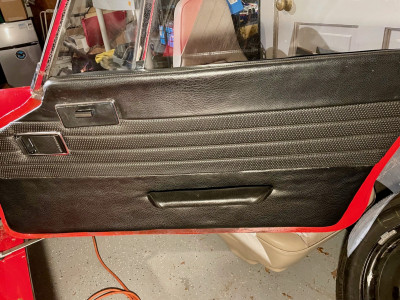
Plus 2 Door card restoration
9 posts
• Page 1 of 1
Hey all, just wanted to see if anybody who's been there and done that has any advice for this.
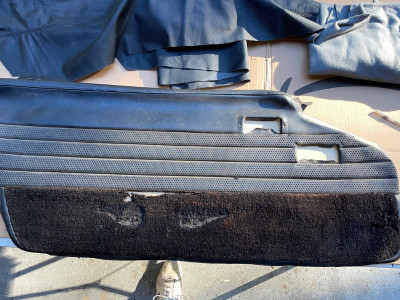
Now that the car is pretty much in the realm of solid operability and the interiour is mostly done, I've finally remembered the door cards I removed eight years ago and stuck in a closet. I'm quite used to having yellow glassfibre with various holes in it next to me when I drive!
Anyway, here's the situation. The vinyl coverings are in surprisingly decent shape all things considered (and would be a better match for the good surviving seat-coverings than would something new), but the carpet inserts are not- they've faded from black to dull tan and no longer feel soft, no doubt the result of decades of UV-exposure here in the hot sunny USA, including decades spent either on a trailer or in a yard (new inserts would be perfect here, since the floor-carpets are all new)
The fibreboard or whatever it is that the backing boards are made of (better than cardboard, but not quite masonite?) is getting a little soft and wavy around the edges.
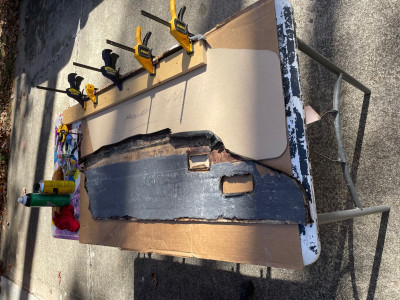
On one of the cards I've removed all the staples and started looking under the covering and it appears that the backing boards were rather liberally painted with a lot of contact-cement and everything is stuck down pretty well- when I try to unstick the covering, it just peels the top layer of the board away with it. I've also noticed a lot of foam padding that has reduced to dust. Thankfully the white foam in the basketweave section is still nice and full, but the darker stuff used above that section and up into the windowsill is all dust. I think I have some thin foam that I can use in those areas, assuming that I can get it all apart without destroying the covering.
Before I started taking one apart my thought was that I could remove the covering from the backing boards, have an upholsterer sew-in some new carpet inserts, make new backing boards, glue & staple it all together and Bob's yer proverbial uncle.
The questions I have:
1. Any suggestion for getting the old contact cement (and fibreboard remnants) off the back of the coverings without damaging the coverings? Doesn't have to be hermetically clean, just good enough to not have any weird bulges and to allow new cement to do its job. The old cement seems very tough stuff. Maybe experiment carefully with some solvents?
2. Any suggestions for a material from which to make new backing boards, preferably something available in the USA? I'm presuming that the exact original stuff isn't but haven't researched it yet. It needs to be the right thickness, able to accept the curve of the door, and able to hold both contact cement and staples. The original stuff actually seems just about perfect for all that criteria, but is there another material just as good or better?
3. Anything at all (materials, methods, whatever) that I haven't considered but should? Any general suggestions?
4. Am I over- or under-thinking any of this?
1970 Elan Plus 2 (not S) 50/2036
2012 BMW R1200GS
"It just wouldn't be a complete day if I didn't forget something!" -Me
2012 BMW R1200GS
"It just wouldn't be a complete day if I didn't forget something!" -Me
-

The Veg - Coveted Fifth Gear

- Posts: 2341
- Joined: 16 Nov 2015
I used ABS plastic sheet about 1/8 thick. Available here in El Paso from a local plastic supplier in 4 x 8 sheets. Smooth on one side and slightly embossed on the other side. easy to cut, won't rot when wet and contact cement sticks to it. Just my idea. Also not too expensive. Gary
- GLB
- Second Gear

- Posts: 158
- Joined: 31 Jan 2018
I found some great cardboard card stock used specifically for door cards. It was at a high performance speed shop. They had a guy in the back cutting this stuff in the shop, and building door cards. I got a 4 x 4' sheet for about 20 bucks. I will get the name for you.
Trying to source this stuff was impossible so I went thru some real trial and error to get a nice result. I built my interior but it was not easy. I made the two door cards along with the rear quarter interior panels, and parcel shelf.
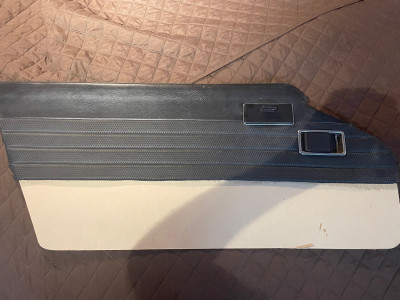
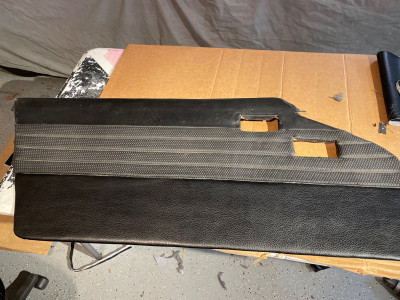
I carefully used some Goof off for big areas of glue or adhesive, but generally didn't mess with the cards due to their fragility. The lower carpeted region was trashy, and disposed of, but the upper most vinyl part was still in pretty good shape. My final dimensions on the cards were a bit off when finally fitted, but generally not noticeable. I also used none of the former card attachment bits, My cards are held on by the top cap, the lower door handle/ armrest. That's it. It still holds the contour pretty well and is securely in place. As an engineer, this was a real tricky arts and crafts project. Took considerable time and patience. But the card stock is the key ingredient. (Plastic also sound like a good alternate approach as well.) Some detailed photos of the effort and build are attached. FYI
'71 Lotus Elan Plus 2S130 (Type 50/0179)
'70 Opel GT
'67 Sunbeam Alpine
'88 Porsche 924 S
'70 Opel GT
'67 Sunbeam Alpine
'88 Porsche 924 S
- mjbeanie
- Second Gear

- Posts: 131
- Joined: 29 Mar 2019
Thanks MJB, that's interesting. I've done a bit of interiour work on mine as well, the door cards being the last major part of it before the interiour looks complete again. I too have made a new shelf (original one wasn't good and I deleted the speakers that lived there), and I re-covered the rear side panels, and made new inserts for them to accommodate relocated speakers (as new ones with their much larger magnets won't fit over the tank in the rear shelf). I've also made new squabs for the rear seats as the originals, while technically intact, are just too cruddy to use in a refreshed interiour. I've also replaced the headlining and carpets with new items and completely restored the dashboard including new veneer. I also have a new centre console from Famous Frank, and my original one was used for making the mould for it as Frank and I live in the same metro area.
1970 Elan Plus 2 (not S) 50/2036
2012 BMW R1200GS
"It just wouldn't be a complete day if I didn't forget something!" -Me
2012 BMW R1200GS
"It just wouldn't be a complete day if I didn't forget something!" -Me
-

The Veg - Coveted Fifth Gear

- Posts: 2341
- Joined: 16 Nov 2015
Wow thats a great deal of accomplishment. Great work I would love to see some photos, if you can pm me.
That would be appreciated.
I am also getting ready to start the headliner next week. If ok with you I would sincerely appreciate your guidance as I am a newbie on this task! Thank you very much- Cheers, Mike
That would be appreciated.
I am also getting ready to start the headliner next week. If ok with you I would sincerely appreciate your guidance as I am a newbie on this task! Thank you very much- Cheers, Mike
'71 Lotus Elan Plus 2S130 (Type 50/0179)
'70 Opel GT
'67 Sunbeam Alpine
'88 Porsche 924 S
'70 Opel GT
'67 Sunbeam Alpine
'88 Porsche 924 S
- mjbeanie
- Second Gear

- Posts: 131
- Joined: 29 Mar 2019
I have an S4 Elan and the door cards are made up as follows, all of which looks like factory build, so I would think the +2's were pretty much the same
1. a fibreglass sheet backing board
2. Next a thin foam sheet on top of this board
3. The factory fabric covering on top
4. Secured with metal clips around the sides and bottom 9can't recall now how many but will check and get back on that.
The foam covering on most cars has by now disintegrated and from what you say yours has done the same. So a gentle bit of heat from a hair dryer as you start to lift the layers apart should not be a problem. The foam will have to be replaced and whatever has peeled off from the backing board will most likely be only a thin covering which will get hidden by the new foam.
As for the backing board itself you should be able to purchase either a sheet of ready made fibreglass, or a suitable plastic type of material suggested above, or even make your own fibreglass sheet on a flat board.
To make it yourself, mark out your door card on the large board, tape up to the marking out with some 2" wide masking tape. Next use some sort of release agent on the area you will be fibreglasing (Non stck cooking oil, Petroleum jelly, baby oil will do if you don't want to purchase specialist release agents). Rub well into the board surface. Now place some fibreglass tissue onto the board slightly overlapping onto the wide masking tape previously marking out you card mold. Mix some resin and hardner (you need to be fairly accurate with the amounts of each and I prefer to go slightly under with the hardner to allow more time to work the mix when putting it on the board), stipple this well into the fibreglass tissue.
Once the pattern has been created let it go off and then apply another layer of tissue and bond to the first, then a third layer which should give you the required thickness and stiffness for your new door card. Leave for 24 hours to set proprly and then peel up the tape all the way around (the tape makes lifting your patern very easy) so now you have your new card which you can finally trim to fit the door exactly, cutting off the excess is easily done with a sharp scalpel or knife and a straight edge.
It is a lot easy to do than to explain and does not take long to stipple each layer on top of one another.
A final tip is to use some thickish plastic sheet to cover over the window motors whilst the panels are off to stop the ingress of water to the contacts and then using double sided tape cut some of the plastic and stick over any openings to prevent water leaking into the interior. The alternative is to cover the whole inside of the door with a thin plastic sheet and either some double sided tape or low tack adhesive all around the door edges,with some additional dabs of adhesive ib strategic places, then slitting any holes needed to enable parts to protrude through to the interior.
Regards
Tony
- tonyabacus
- Third Gear

- Posts: 295
- Joined: 16 Sep 2003
The +2 wasn't a fibreglass board, I'm pretty sure that it was just hardboard. It disintegrates with time and moisture. I'm rebuilding mine with marine ply, bending it was fun.
- mikealdren
- Coveted Fifth Gear

- Posts: 1224
- Joined: 26 Aug 2006
There are various boards available and in the UK we have something called Millboard which is and was often used both by manufacturers as well as restorers. This is a type of fibreboard which is easy to cut and shape and of a thickness which provides a stiff surface without being bulky It is advisable to fit a thin sheet of plastic to the inside of the door panel to prevent moisture and rain getting onto the backing boards, a very simple precaution which prevents future distortion and mould getting onto the carpet materials. One reason why I prefer to make up new fibreglass backing boards as they also don't damage around the clip holes when taking off and putting on and are simple to make.
Here are some UK sites that may help describe and show the different materials
https://newtoncomm.co.uk/collections/lotus-elan
https://www.woolies-trim.co.uk/p-1648-millboard
https://automobiletrim.com/window-channel.html
Tony
Here are some UK sites that may help describe and show the different materials
https://newtoncomm.co.uk/collections/lotus-elan
https://www.woolies-trim.co.uk/p-1648-millboard
https://automobiletrim.com/window-channel.html
Tony
- tonyabacus
- Third Gear

- Posts: 295
- Joined: 16 Sep 2003
9 posts
• Page 1 of 1
Total Online:
Users browsing this forum: No registered users and 30 guests

