Removing Exhaust Headers Plus 2
18 posts
• Page 1 of 2 • 1, 2
Apologies for dumb new owner question, but search was not my friend in this case.
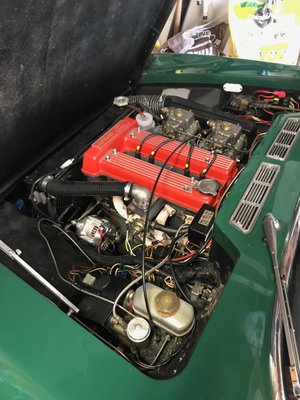
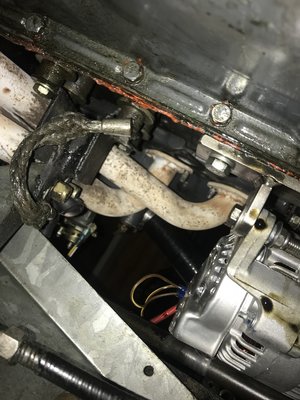
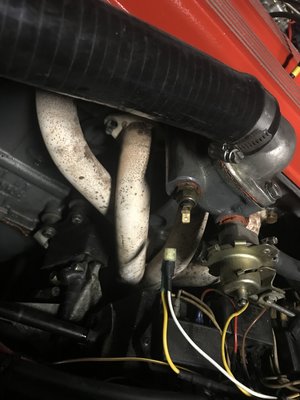
Working on a Plus 2 with after market headers 4-2-1 (so they break down into two separate pieces when removed from the heads).
How do I get the darned headers out of the car?
The only way that I can currently see is by removing the header side engine mount and before I do that, I wanted to see if I am missing an obvious alternate route.
Is there a simple solution here that I am missing?
Thanks very much.
Nick
Nick Baxter
1970 Plus 2S (Federal)
1969 Plus 2 (UK) - sold
1970 Plus 2S (Federal)
1969 Plus 2 (UK) - sold
- nwbaxter66
- Second Gear

- Posts: 179
- Joined: 03 Aug 2006
Place a jack under the oil pan with a board between the jack and the pan to spread the load. Then, as you have guessed, remove the motor mount. I will hazard a guess that you have removed the Y piece between the header pipes and the exhaust pipe. Wiggle a bit, and things will come apart.
Rob Walker
26-4889
50-0315N
1964 Sabra GT
1964 Elva Mk4T Coupe (awaiting restoration)
1965 Ford Falcon Ranchero, 302,AOD,9",rack and pinion,disc,etc,etc,etc
1954 Nash Healey LeMans Coupe
Owning a Lotus will get you off the couch
26-4889
50-0315N
1964 Sabra GT
1964 Elva Mk4T Coupe (awaiting restoration)
1965 Ford Falcon Ranchero, 302,AOD,9",rack and pinion,disc,etc,etc,etc
1954 Nash Healey LeMans Coupe
Owning a Lotus will get you off the couch
- prezoom
- Coveted Fifth Gear

- Posts: 1337
- Joined: 16 Mar 2009
Thank you very much... I am now looking forward to Wednesday night (:
Nick Baxter
1970 Plus 2S (Federal)
1969 Plus 2 (UK) - sold
1970 Plus 2S (Federal)
1969 Plus 2 (UK) - sold
- nwbaxter66
- Second Gear

- Posts: 179
- Joined: 03 Aug 2006
Nick
Make a mental note how they are removed , it will help with re-assembly...that's just as tricky....
John
Make a mental note how they are removed , it will help with re-assembly...that's just as tricky....
John
-

john.p.clegg - Coveted Fifth Gear

- Posts: 5744
- Joined: 21 Sep 2003
Imho keep the studs but while you're there fit new studs assembled with copperslip.
+ new brass nuts and lockwashers.
Alan
+ new brass nuts and lockwashers.
Alan
Alan.b Brittany 1972 elan sprint fhc Lagoon Blue 0460E
- alan.barker
- Coveted Fifth Gear

- Posts: 3707
- Joined: 06 Dec 2008
some of us use cap heads ( much easier with a ball headed allen key than a spanner/socket ) and if you want to do the job 100% , helicoil while you're in there..
John
John
-

john.p.clegg - Coveted Fifth Gear

- Posts: 5744
- Joined: 21 Sep 2003
If you need extra wiggle room you could try removing one bolt from the engine mount under the carbs. This should allow easier/more movement of the engine as it can rotate on the other mount.
Just remember it is possible you just have to find the magic sequence that gets them out...
Just remember it is possible you just have to find the magic sequence that gets them out...
'73 +2 130/5 RHD, now on the road and very slowly rolling though a "restoration"
- mbell
- Coveted Fifth Gear

- Posts: 2704
- Joined: 07 Jun 2013
(: ... and patience
I think that the engine mount trick should give me the space I need.
N
I think that the engine mount trick should give me the space I need.
N
Nick Baxter
1970 Plus 2S (Federal)
1969 Plus 2 (UK) - sold
1970 Plus 2S (Federal)
1969 Plus 2 (UK) - sold
- nwbaxter66
- Second Gear

- Posts: 179
- Joined: 03 Aug 2006
Thanks to all the advice, the angle grinder was warmed up, new disc, but was not needed.
Removed Clutch Slave Cylinder and Engine Mount, with oil pan supported as described, removed alternator and top radiator hose and both header pieces came out from below with minimal cursing and verbal persuasion.
Thanks for the assistance, not sure that I needed to take off the alternator and I could have created more room by removing the sway bar and chassis brace but that was unnecessary.
I am sure that the reverse will not be as easy (: But at least everything will be nicely clean while doing that job.
Nick
Nick Baxter
1970 Plus 2S (Federal)
1969 Plus 2 (UK) - sold
1970 Plus 2S (Federal)
1969 Plus 2 (UK) - sold
- nwbaxter66
- Second Gear

- Posts: 179
- Joined: 03 Aug 2006
Blimey, I've never taken them out from underneath, food for thought though.
- AussieJohn
- Third Gear

- Posts: 456
- Joined: 10 Jun 2007
AussieJohn wrote:Blimey, I've never taken them out from underneath, food for thought though.
You should be all right in Oz, your cars are already upside down.
Meg
26/4088 1965 S1½ Old and scruffy but in perfect working order; the car too.
________________Put your money where your mouse is, click on "Support LotusElan.net" below.
26/4088 1965 S1½ Old and scruffy but in perfect working order; the car too.
________________Put your money where your mouse is, click on "Support LotusElan.net" below.
-

Quart Meg Miles - Coveted Fifth Gear

- Posts: 1278
- Joined: 03 Oct 2012
18 posts
• Page 1 of 2 • 1, 2
Total Online:
Users browsing this forum: No registered users and 17 guests


